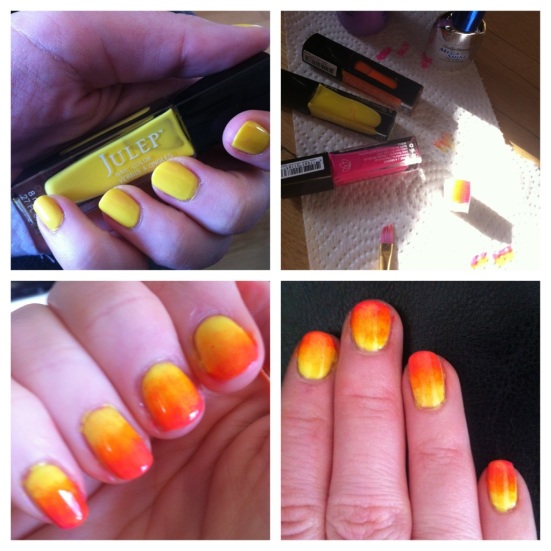
This weekend I finally decided to try my hand at a gradient manicure, the results were not perfect but I wouldn’t call it a fail either 🙂
I followed Nails by Kayla Shevonne’s tutorial for Gradient nails found here
Her instructions were awesome and easy to follow, I only made one small change which was to lightly dampen by sponge before starting in hopes to prevent my makeup sponge from sucking up too much polish.
 I decided to try for a summery sunset look, here’s what I did.
I began with a 2 coat base of a beautiful bright yellow named “Abbie” from this month’s Julep’s The Brights Collection
I then dampened a makeup sponge that I had pre cut into a smaller piece (saving the rest for another manicure).
All of the colours that I used for my manicure were from April’s The Brights Collection from my Julep Maven subscription. I painted three stripes of bright polish on my makeup sponge beginning with “Avery” a bright pink, followed by a bright orange stripe of “Kaylen” that just slightly overlapped the first colour. Finally I painted a third stripe of my original base coat colour “Abbie”, slightly overlapping “Kaylen”. I’m not sure if the overlapping was necessary but I figured that it wouldn’t hurt.
I then sponged the colour onto my nails dabbing lightly up and down so as to blend the design.
Once all my nails were done and dry, I dipped an angled paintbrush in nail polish remover to clean up the edges. I finished up with a coat of Sally Hansen Mega Shine Top coat.
I’m pretty happy with how it turned out, although I am questioning whether my colour choice for sunset nails may have resulted in more of a candy corn look 😉
What do you think?
xox
Amandainmtl

Click on the image above to learn more about the Julep monthly Maven subscription program
Very pretty!
Thanks 🙂